Enterprise -> Users
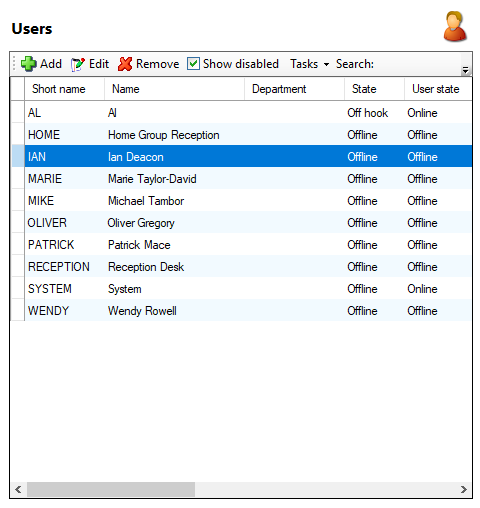
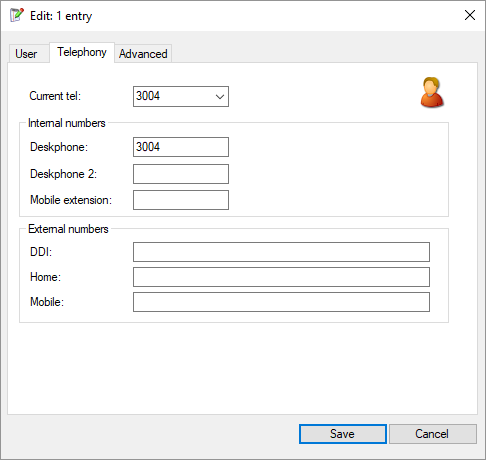
The software is designed to work with Windows / Mac OSX operating system users and link them with the telephone extension that the person uses. This is done through the client software. As the software is installed and used on each new PC / Mac, the user's details will be automatically created on the PHONE-LiNK Server (unless restricted as explained in the Client Security section). This links the new user's extension number to their user name. This association can be viewed in the "Current Tel" field in the Telephony tab in the edit user section.

Add button

New users can also be added from this screen by clicking 'Add'. Adding new users is particularly useful if you do not want the client to automatically create a user account. If this is the case, then typically you would add a user per person who wants to use the client software.

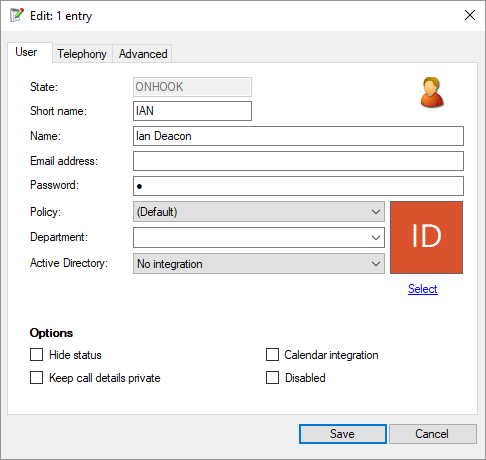
When adding a user manually, you should enter their 'Short name' (or unique login), their (full) name, and choose a password for them. The user can then enter their short name and password in their client software. Other users will then be able to select them on the 'Presence' list and send messages to them by name.
Type in the email address if you want the user to be contactable via email services provided in the PHONE-LiNK software. You should also select the appropriate security policy for the user from the 'Policy' dropdown list once they have been created (see 'Security policies' below). It is also a good habit to assign the "Department" to each user, depending on their role and position within the company.
Users can also be automatically created directly from Microsoft Active Directory. (Additional license required.)
The last four options allow you to: (1) "Hide status" will remove a user from the Presence window (when set to "Users" view). (2) "Keep call details private" will hide the user's active call details in the Presence window. (3) "Calendar integration" will integrate with Microsoft Exchange Calendar. Meetings/Events recorded in the Microsoft Exchange Calendar will be matched with the current availability and status in the presence window. (Requires "Calendar integration" license) (4) "Disabled" will disable the user completely (user will be unable to login and will disappear from the "users list").

The Telephony tab allows you to assign multiple internal numbers (Deskphone, Softphone and Mobile extension) and external numbers (DID, Home, Mobile) to each individual user. Associating an internal number to a user means the user can only sign in using this number. All the above fields correspond to multiple devices which can be assigned to the user. They can be entered either manually or auto-populated from Microsoft Active Directory. (Additional license required.) 'Current tel' is the current default active number associated with the user and is automatically set to the oldest session of any of the user's three active numbers (devices). The value can be manually changed by selecting a value from the dropdown box. The value will be visible to PHONE-LiNK users in the Presence Screen (under 'Users' mode) of each PHONE-LiNK PC Client. It is important to note that Active Directory integration also effectively acts as a user device and, when active, will set 'Current tel' to the number in 'Deskphone' field. As Active Directory integration maintains a permanent session and is very likely to be the oldest session, the value of 'Current tel' will only change (when Active Directory integration is active) when manually changed from this tab.
Populating values into the "internal numbers" fields will also ensure that the absence greeting text is concurrently updated and consistent across all the user's numbers (devices) - as viewed from the "Extensions" view in Presence window.
Edit button

The users that have already been created can be administered from this page by selecting them in the list and clicking the 'Edit' button.
Remove button

To delete a user, select it from the list and click on the 'Remove' button.
Search

You can search for listed users by entering text into the 'Search' box. The search function looks through the information in the item list.
Tasks

To apply new settings to one or more users, select them from the list and choose the 'Apply user settings' option from the 'Tasks' menu and pick your preferred user settings; this will apply the desired settings to all of the selected users. This functionality is fully covered in the 'User settings' and "Editing public settings" under the "Deployment section".
Show disabled

To see disabled users, tick the "Show disabled" box on the top of the "Users" page.

 Report this page